What earns the 7.5.
Five equally weighted categories assess documented equipment and buyer fit. No measured speed, handling, durability, runtime or reliability scores are assigned.
Build / buyer fit
8.5/10Recognizable body and straightforward classic construction make a coherent nostalgia build.
Documented equipment
7.0/10Supplied 540 and rear oil dampers define the stock package.
Setup / adjustment
7.5/10Current box must settle controller revision; the mechanical manual is clear.
Service understanding
7.5/10Simple tub/rear gearbox and manufacturer diagrams support maintenance learning.
Complete-purchase value
7.0/10Best value when the classic form is wanted; electronics and body paint still cost extra.
The buying case: The Hornet
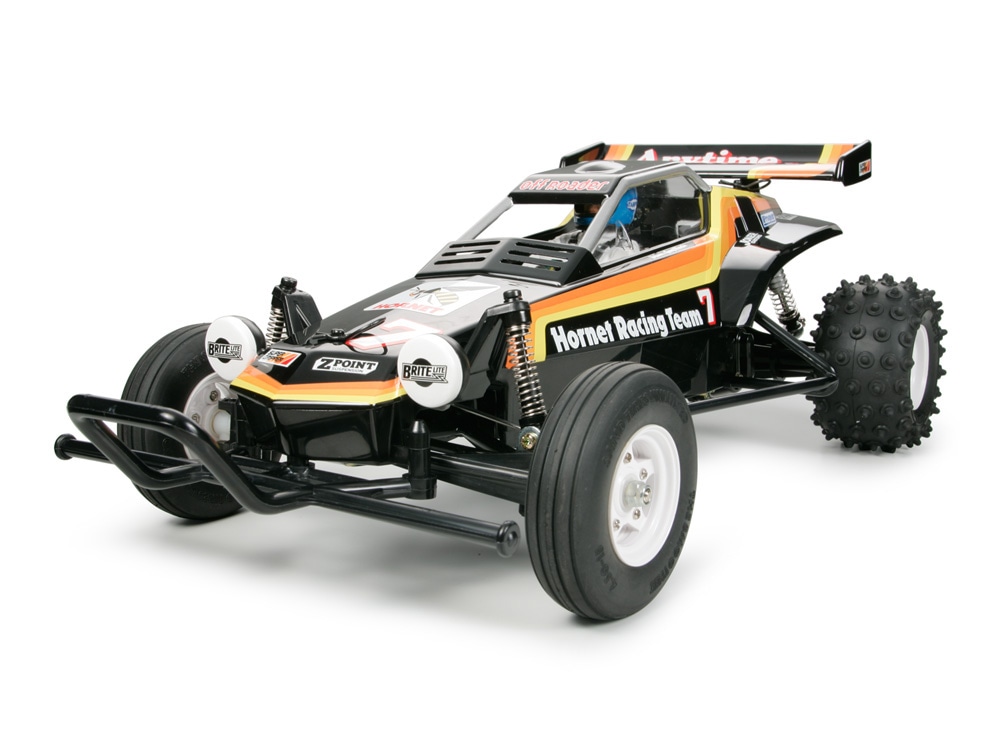
The Hornet is the right classic kit for somebody who wants a Hornet, rather than a generic inexpensive buggy. Its black-and-yellow body, rear-drive layout and straightforward construction make a recognizable project with a supplied 540 motor and oil-damped rear axle. The chief reservation is that the re-release preserves old mechanisms. A buyer expecting modern race suspension, an assembled radio installation or immediate rough-ground bashing should make that expectation visible before ordering.
We cover the body-inclusive re-release and the regional 58336-A package, verified by Amazon as TAM58336A. The original global product page still names an older controller, so its electronic equipment statement should not be read as the precise contents of every current A box. Confirm the regional ESC revision and connector with the offered kit. The shell and vehicle hardware are included, making this a complete-car assembly project rather than a chassis or body purchase.
I would shortlist it for a returning enthusiast who enjoys reconnecting with a simple mechanical layout and is happy to trim and finish a clear body. It can also serve a patient first builder, with help choosing the remaining equipment. This is a research-led buying assessment. We do not claim personal ownership, top speed, measured cornering or long-term durability, and we do not transfer an older owner’s modified-car results onto an unbuilt modern regional box.
Sources: Manufacturer ↗ · Manufacturer manual / specification ↗
The complete package: The Hornet
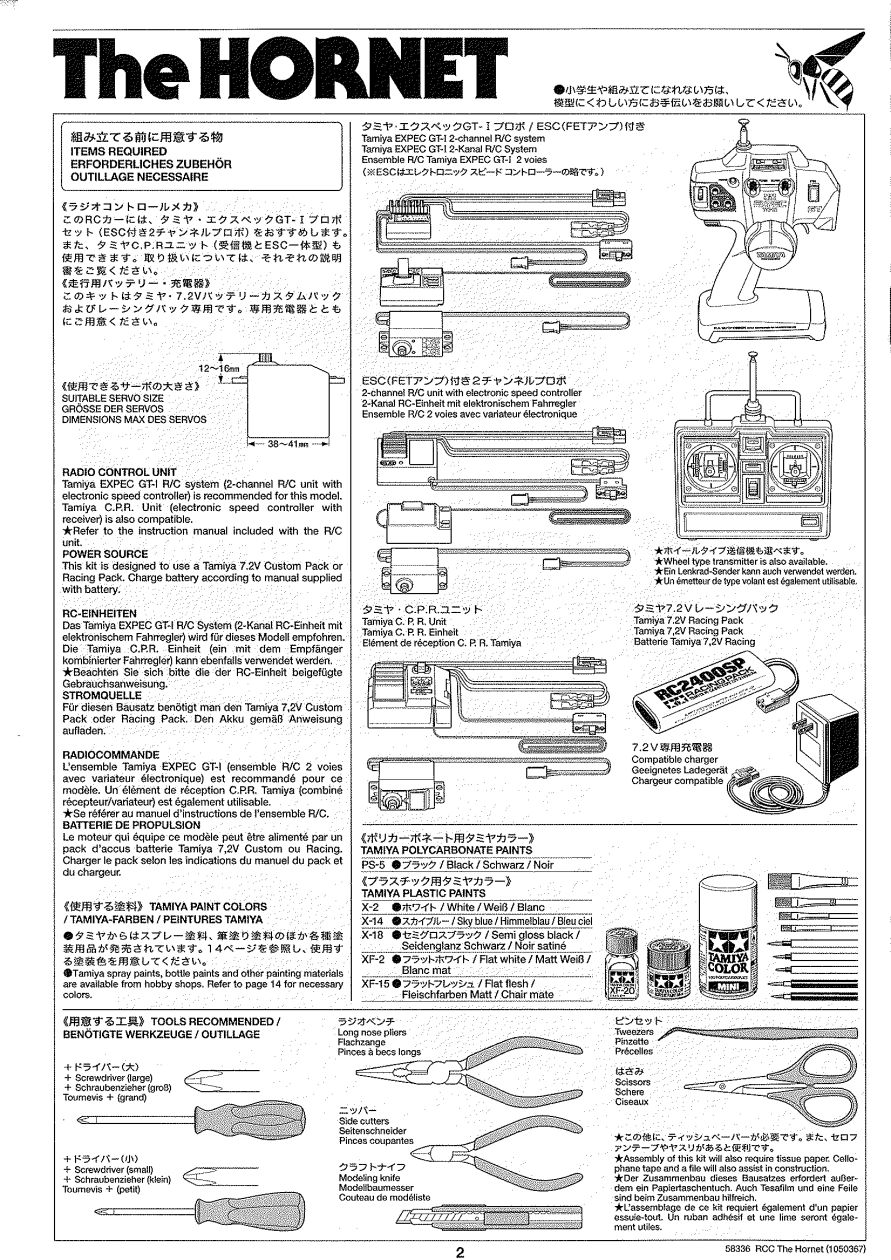
The Hornet kit includes its polycarbonate shell, buggy tires and wheels, ABS tub, suspension parts, sealed rear gearbox and RS-540 brushed motor. Separate purchases include transmitter and receiver, steering servo, drive battery, charger, transmitter cells, paint and tools. The global description identifies a TEU-101BK, while the A regional listing does not provide a current controller model in its sanitized features. The practical completion plan is to confirm that item before buying another ESC or selecting the battery connector.
The finished manufacturer photo should be understood as the target of the build and paint work. The clear shell is not a factory-decorated RTR body. Trim and trial-fit it before painting, follow the instructions’ masking and hole positions, and choose polycarbonate paint for the shell. The driver/detail finishing stage may use different paint materials, so a single arbitrary spray can is not a complete finishing plan.
Build the rear transmission in a clean area, check the shafts and differential movement, then move through the front suspension and steering. The three-piece wheels also deserve attention to their assembly sequence. Read the diagram rather than assuming the wheel construction matches a modern one-piece buggy rim. The kit’s understandable structure is a good teaching tool, but that benefit comes from inspecting each stage, not from rushing to a complete silhouette and relying on a powerful motor to hide a tight gearbox.
Sources: Manufacturer ↗ · Manufacturer manual / specification ↗
Drivetrain and power: The Hornet
A rear-mounted 540 motor powers the rear wheels through a sealed gearbox with a differential. It is conventional RWD, with no center shaft or driven front axle. The back wheels must both transmit power and manage the surface’s available grip. That is why smooth throttle inputs and an appropriate practice area matter more to the first session than an upgrade motor selected from a high-speed video.
The differential allows different wheel speeds through a bend. Build and lubricate it using the manual, check free rotation before closing the housing and verify that the final axle arrangement moves as intended. An enclosed gearbox helps protect the internal gears, but it cannot compensate for an incorrectly positioned spacer or an over-tight wheel attachment. Check the driveline by hand before connecting the battery, and investigate unexpected resistance mechanically before reaching for electronic adjustments.
Keep the supplied RS-540 for the first baseline. A hotter motor changes the ownership comparison and can make an old-style suspension harder to manage without proving that the car needed more power. Match the ESC and pack to the model guidance and the actual controller instructions. A controller’s headline voltage capability is not a blanket recommendation for that voltage in the Hornet. My first priority would be a correctly assembled stock power system with a compatible charger, then learning the car’s normal behavior before deciding which specific problem a modification would address.
Sources: Manufacturer ↗ · Manufacturer manual / specification ↗
Radio and setup: The Hornet
Because the radio and servo are separate, choose them as a working pair with the receiver rather than as disconnected bargains. Check protocol compatibility, servo fit and connector routing before permanently mounting anything in the tub. A returning owner may be able to reuse equipment, but an old transmitter without a matching usable receiver does not shorten the shopping list. Inspect existing leads and connectors rather than assuming age alone makes them either useful or unusable.
Center the servo electronically before fitting the horn and saver. Adjust steering at the linkage, establish correct channel direction, and calibrate the actual supplied or chosen ESC with the wheels raised. Test neutral, forward and brake in the order prescribed by the electronics documentation. There is no standard Hornet gyro or smartphone interface to configure. Any chosen transmitter’s throttle limit can be helpful, but the function belongs to that radio rather than being included equipment claimed for the kit.
SupermotoXL’s nostalgia review concerns an owner’s re-release Hornet and discusses the appeal of its realistic old buggy appearance. That is useful attributable ownership context, not our drive. Its electronics, options and ground are not automatically your regional package. I would use owner coverage to ask practical questions about installation and expectations, while keeping the manufacturer instructions as the assembly authority. A first powered session should confirm that your own car responds correctly, not try to reproduce another owner’s experience on different equipment.
Sources: Manufacturer ↗ · Manufacturer manual / specification ↗ · Independent coverage ↗
Steering and suspension: The Hornet
The front suspension uses independent swing axles with friction dampers. The rear is a rolling rigid axle with oil-filled dampers. This distinction is one of the stock Hornet’s useful features compared with a simpler all-friction classic, but it is not four-wheel independent oil-damped suspension. Know what you are buying before treating the car as an equivalent of a modern race buggy with a vintage shell.
Build the rear dampers consistently using the manual’s filling and sealing steps, then compare their action. Verify that the rear assembly can roll within its intended movement rather than tightening it until every visible motion disappears. At the front, keep the suspension pivots free and check symmetry. A stuck wheel movement can look like a steering issue once the car is running, so the bench check is easier than diagnosing it under throttle.
Center the servo, set the linkage and sweep steering through its mechanical range. Limit the commanded travel before the servo forces a stop, then repeat the check with the shell installed. The aim is a sensible stock baseline, not the biggest steering angle you can extract. We have not measured grip or rebound control, and the rear oil dampers are not evidence of a quantified handling improvement. They are documented equipment and an additional assembly task that make the classic project more interesting while preserving its old-style layout.
Sources: Manufacturer ↗ · Manufacturer manual / specification ↗
Where to drive: The Hornet
The Hornet’s ribbed fronts and spiked rear tires point toward buggy driving on dirt and other manageable outdoor surfaces. I would begin on relatively even compact dirt or open pavement to check control, with room around the car and no nearby sharp curb. The global marketing description is broad, but our buying recommendation does not stretch it into deep-grass ability or unrestricted rough-ground use. Ground scale matters to a small old buggy.
Practice a straight acceleration, a stop and a broad turn before attempting slides or jumps. RWD makes surface grip and throttle timing part of the learning process. If the back steps out, reduce input and observe the ground rather than immediately changing multiple components. Those are suggested learning exercises, not claims that we have assessed this particular car’s balance. Your completed electronics and tire condition will also affect the behavior.
After a run, clear dirt from the wheel shafts, front pivots and rear mounting area, and inspect the wiring under the shell. The enclosed gearbox is useful, but exposed moving parts still need attention. Avoid dragging dusty cloths over the body’s decoration, and follow the water limitations of the actual electronics installed. The kit does not establish a whole-car waterproof claim. For a returning modeler who wants to keep the Hornet attractive, a clear dry practice area gives more useful driving time and fewer cosmetic repairs than proving how much mud the model can collect.
Sources: Manufacturer ↗ · Manufacturer manual / specification ↗
Body and service: The Hornet
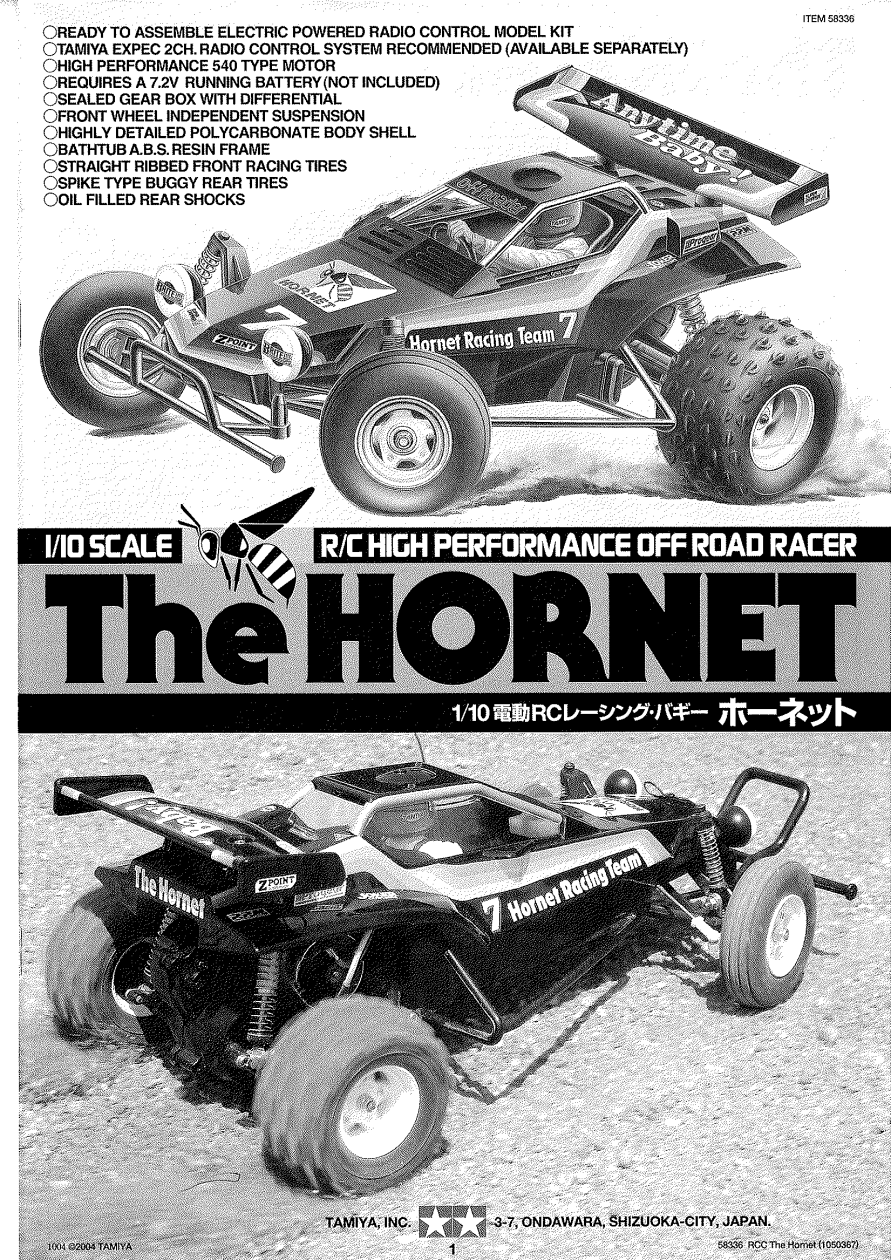
The polycarbonate Hornet shell is central to the purchase. Its familiar silhouette makes sense of the re-release even before considering drivetrain details. The official manual includes whole-car illustrations and assembly references; our gallery labels those pages as manufacturer technical material, not our workshop photographs. They help explain what you will build without pretending that the review has a physical test car.
Trial-fit and trim the shell before spraying. Mark the required holes accurately and confirm tire and steering clearance. Use the paint and finishing instructions appropriate to the shell rather than repeating the molded-body approach of a Grasshopper II. The underlying mechanism may be simple, but a tidy body still requires planning. Keep decals organized and allow finishing work to proceed without tools or loose screws rubbing against the completed paint.
Tamiya lists a 400 × 230 × 150 mm footprint. That helps with storage and carrying plans, while an exact close-fitting case should be sized around your finished model and any added details. Keep the removable body arrangement practical for battery service. A wire that needs to be threaded through the shell every time you lift it is an avoidable inconvenience. I would preserve the recognizable stock shape on a first re-release build and reserve additional lights or decoration until the car is functioning and its routine access has been rehearsed.
Sources: Manufacturer ↗ · Manufacturer manual / specification ↗
Startup basket: The Hornet
Tower Hobbies retains a $156.10 reference for exact regional TAM58336A while its product data marks the kit discontinued. It is an archived retailer price, not a currently purchasable Tower offer or manufacturer MSRP. A separately verified Amazon listing may identify another seller’s remaining stock, which must be checked live. This distinction keeps the Hornet’s historical/regional identity and published reference separate from actual present availability. Confirm the offered controller revision and finish the radio, battery and paint quote before treating any vehicle-only amount as the cost of a running classic.
The first-session basket includes kit, transmitter and compatible receiver, steering servo, suitable 7.2 V drive pack, matching charger, transmitter cells, appropriate body/detail paint and assembly tools. Add a brushed ESC if the offered regional kit does not supply one, and verify the present controller model and battery connector. The checked sources do not price all those exact choices together, so this article supplies the complete list and leaves the missing equipment prices for a real quote.
For someone with compatible hobby equipment, the build may fit easily into an existing setup. Check pack dimensions and receiver compatibility before counting those items as reuse. Bearings and other options are separate costs, not evidence that they came in the stock box. I would avoid budgeting a major immediate power conversion for a car bought to recreate a familiar classic. If the car needs a new motor, shocks and many other parts before it matches the intended use, compare the total with a complete contemporary buggy and decide whether the Hornet build is still the value you wanted.
| Item | Included / extra | Price basis |
|---|---|---|
| Reviewed vehicle | Kit/car only | $156.10 · stated dated reference |
| Motor | RS-540 brushed · included | Included/extra as described |
| ESC | Original global page TEU-101BK; A regional revision must be confirmed | Confirm regional box; price any missing controller separately |
| Radio / servo | 2-channel radio/receiver + steering servo · extra | Extra; quote exact components |
| Drive power | Suitable 7.2 V pack and charger · extra | Extra; quote exact pack and charger |
| Tools / finishing / transmitter cells | As required by exact manuals | Price required items separately |
Sources: Manufacturer ↗ · Manufacturer manual / specification ↗ · Retailer price reference ↗
Real alternatives: The Hornet
The Grasshopper II 2017 is a complete body-inclusive classic with a molded white shell and smaller supplied 380 motor. It is an appropriate alternative for a first builder who prefers its body and simpler stock power brief. Its friction-damped rolling rear setup is a documented difference. Selecting between them should include the finishing project and exact regional equipment, not just a title-level comparison of two nostalgic buggies.
The Hornet EVO 58742 is a distinct body-inclusive kit for a buyer drawn to the Hornet name but willing to consider a changed running platform. Verify its exact components and completion basket before using it as an alternative. It should not be described as the same 58336 car merely because the decoration follows the original. If modernized suspension is the attraction, the specific EVO hardware deserves its own research rather than borrowing this re-release’s specification table.
The Fighter NXGEN DT-04 gives a newcomer another complete-kit route with independent suspension, CVA oil dampers and white molded body panels. It makes sense when the beginner-buggy function matters more than recreating a particular classic. For club use, consult the organizer before choosing either car. I would take the Hornet when its own look and simple construction are the desired object, the Grasshopper II for its first-build brief, and the Fighter for a contemporary beginner project. None of those choices requires inventing a tested handling ranking.
Sources: Manufacturer ↗ · Manufacturer manual / specification ↗
Buying verdict: The Hornet
The Hornet’s recommendation is strongest when nostalgia and understandable construction are deliberate purchase priorities. A supplied 540 motor, sealed rear gearbox, rear oil dampers and complete body project give the kit substance beyond its familiar name. The reservations are the remaining equipment cost, current regional ESC uncertainty and the age of the mechanisms retained by the re-release. These are manageable when the buyer understands what experience the car is intended to provide.
Our five equally weighted categories consider classic build appeal, stock equipment, setup documentation, service learning and complete-purchase value for a returning Hornet enthusiast. No measured speed, steering performance, crash tolerance or reliability result is assigned. The owner review supplies credited context while its modified or differently equipped car remains separate from the regional box reviewed here. The manufacturer and API references likewise keep engineering facts and commercial identity in their proper roles.
I would buy the Hornet for somebody who wants to build and finish a Hornet, then drive it on forgiving ground before deciding whether any option is needed. Confirm the current controller, choose coherent radio and power equipment and let the standard project establish the baseline. I would pass for immediate RTR convenience, serious rough-ground bashing or a current race class favoring another platform. The re-release earns a place in the garage when its recognizable form and mechanical simplicity are the intended reward, rather than excuses for avoiding a clear equipment and terrain decision.
Know exactly what you’re ordering.
Published manufacturer specifications for model 58336-A. Conflicting figures are flagged rather than silently corrected.
| Exact model / SKU | Tamiya 58336-A |
|---|---|
| Amazon ASIN | B09PF8TC7Z · API verified |
| Scale / drivetrain | 1/10 · RWD |
| Purchase format | Body-inclusive assembly kit |
| Motor | RS-540 brushed · included |
| Speed controller | Original global page TEU-101BK; A regional revision must be confirmed |
| Radio / steering servo | 2-channel radio/receiver + steering servo · extra |
| Drive battery / charging | Suitable 7.2 V pack and charger · extra |
| Length / width / height | 400 × 230 × 150 mm |
| Wheelbase | Follow model-specific manual; no guessed dimension |
| Suspension | Front independent swing axle/friction dampers; rolling rear axle/oil dampers |
| Tires / wheels | Ribbed fronts; spiked rears; three-piece wheels |
| Gear arrangement | Standard manual arrangement · no speed inferred |
| Body | Body supplied · finishing per exact regional instructions |
| Specification caveat | Global page names historic TEU-101BK. Regional TAM58336A part number documents an A box but does not establish the present controller model. |
Sources: Manufacturer ↗
The questions worth asking.
Does this exact model come ready to run?
No. It is a body-inclusive assembly kit. The body and chassis are supplied, but assembly, finishing and completion electronics remain part of the purchase.
What motor and controller are included?
RS-540 brushed · included. Original global page TEU-101BK; A regional revision must be confirmed. Confirm the offered regional box before buying replacement electronics.
What do I need for the first session?
2-channel radio/receiver + steering servo · extra. Suitable 7.2 V pack and charger · extra. Transmitter cells, appropriate finishing materials and assembly tools also need checking.
What ground should I plan to use?
The Hornet’s ribbed fronts and spiked rear tires point toward buggy driving on dirt and other manageable outdoor surfaces. I would begin on relatively even compact dirt or open pavement to check control, with room around the car and no nearby sharp curb. The global marketing description is broad, but our buying recommendation does not stretch it into deep-grass ability or unrestricted rough-ground use. Ground scale matters to a small old buggy.
Which specification differences should I check before ordering?
Global page names historic TEU-101BK. Regional TAM58336A part number documents an A box but does not establish the present controller model.
Is the editorial rating a driving test or Amazon star rating?
Neither. It evaluates the documented complete purchase for returning hornet fan rebuilding the classic. Manufacturer facts, API identity and independent context are credited separately. No speed, grip, crash or reliability measurements are invented.
How this review was researched.
Manufacturer documentation establishes the mechanism and requirements. Amazon Creators API verifies the exact listing/part number and dated offer. SupermotoXL · owner’s 2004 re-release Hornet review supplies attributed context; any modified build or sibling variant is explicitly distinguished in the article. Global page names historic TEU-101BK. Regional TAM58336A part number documents an A box but does not establish the present controller model. The independent USD reference is an archived/discontinued Tower Hobbies exact-SKU Product/Offer. It is not a current purchasable Tower offer. API matching can identify another seller’s remaining stock.
Research-led buying assessment using exact manufacturer documentation, verified Amazon identity and attributable independent coverage. We have not physically driven this model.
- Tamiya · exact model product/specification ↗Manufacturer · checked 13 Oct 2026
- Tamiya · assembly/body or regional specification documentation ↗Manufacturer manual / specification · checked 13 Oct 2026
- Amazon Creators API · exact ASIN B09PF8TC7Z ↗API product verification · checked 13 Oct 2026
- SupermotoXL · owner’s 2004 re-release Hornet review ↗Independent coverage · checked 13 Oct 2026
- Tower Hobbies archived/discontinued USD reference · exact regional kit only ↗Retailer price reference · checked 13 Oct 2026
13 October 2026: original complete-car research review, exact API identity, current evidence ledger and credited manufacturer media.
THE GARAGE EDITOR’S CALL
A considered purchase for returning hornet fan rebuilding the classic
I would buy the Hornet for somebody who wants to build and finish a Hornet, then drive it on forgiving ground before deciding whether any option is needed. Confirm the current controller, choose coherent radio and power equipment and let the standard project establish the baseline. I would pass for immediate RTR convenience, serious rough-ground bashing or a current race class favoring another platform. The re-release earns a place in the garage when its recognizable form and mechanical simplicity are the intended reward, rather than excuses for avoiding a clear equipment and terrain decision.
Check exact car on Amazon ↗